RealVNC Logo
VNC Viewer 4.0 for Windows
Index
Installation
Connecting to a VNC Server
Connecting using existing .vnc files
Configuring VNC Viewer
The Options
Colour/Encoding Options
Input Options
Miscellaneous Options
The F8 Menu
Installation

VNC Viewer for Windows can be installed as an optional component of the WinVNC setup package. If the viewer has been installed in this way then it will be accessible via the Start Menu group created during the installation process (usually RealVNC/VNC Viewer 4).

The viewer executable may also be downloaded, either directly or Zipped. The VNC Viewer for Windows is designed to run stand-alone, without requiring any other packages to be installed first.

Connecting to a VNC Server

If installed by the WinVNC setup package then VNC Viewer is accessible from the Start Menu.

If downloaded directly, the VNC Viewer can be run either by double-clicking on the program icon, or from the command-line.

The VNC Viewer will present the Connection Details dialog, allowing the IP address or name of the target VNC Server to be specified.

If the VNC server's Display Number is non-zero then the display number can be specified by adding a colon to the server's IP address or name, followed by the display number:

If the VNC server is using a non-standard port number to accept connections then this is specified by adding two colons to the server's address or name, followed by the port number:

Once you have selected the VNC server to connect to, you can simply click Ok or press return to attempt to connect to it. If your connection attempt succeeds then the server's details will be added to the Connection Details drop-down menu, to save you typing next time.

Alternatively, you can select the Options... button, to override the default connection configuration, before you connect. See the VNC Viewer for Windows Options documentation for more details.

Connecting using .vnc files

VNC Viewer 4 supports loading and saving of .vnc files, containing a set of connection options. Although the format of .vnc files saved with VNC Viewer 4 differs from that used by VNC Viewer 3, it is capable of loading both the old and new formats.

To use a connection options file from the command-line, simply run VNC Viewer 4 with the -config command-line option, followed by the .vnc filename.

e.g. vncviewer.exe -config c:\home\jnw\vnc\my_home_machine.vnc

If you have installed VNC Viewer using the WinVNC setup package then .vnc files will have been automatically registered, so that you can simply double-click on one to have VNC Viewer open it.

Alternatively, if you have had VNC Viewer 3 installed and have used .vnc files with it then it is likely that VNC Viewer 3 is already registered with Windows as the application responsible for .vnc files. VNC Viewer 4 supports the old /config form of the -config command-line option, so you should find that you can simply replace your old VNC Viewer with the new one and have .vnc files continue to work.

Configuring VNC Viewer

VNC Viewer provides a number of options allowing its behaviour to be tailored to your needs. These are configured in one of three ways listed below.

Changing the Default Options

VNC Viewer allows a set of options to be saved per-user, which will be used as the defaults for all connections that user makes to VNC Servers. The Default Options can be overridden from the Connection Details dialog, before making a connection, or during a connection, or by specifying the options to override on the VNC Viewer command-line.

While the VNC Viewer is running in listening mode, it will place an icon in the system tray. Right-clicking on this icon will cause a menu to be displayed, through which the Default Options may be accessed. The Default Options are saved on a per-user basis, and are used for all subsequent VNC connections.

Changing the Options for a New/Current Connection

The Options dialog can be access from the Connection Details dialog, when making a new VNC connection, or from the F8 Menu of an active connection. In either case, the dialog can be used to override any settings configured through the Default Options dialog.

Specifying Command-Line Options

VNC Viewer allows any option to be specified on the command-line when it is launched. Options specified on the command-line override those specified in the Default Options dialog. Options configured on the command-line can be changed once a connection has been made, using the Connection Options dialog, though.

The Options

The Options dialog consists of a number of pages of options, grouped according to their function. The following documentation describes each option and the equivalent command-line parameters.

Colour/Encoding

AutoSelect=true/false
Auto select

The Auto select check-box controls whether or not VNC Viewer should attempt to automatically gauge the speed of the network connection to the VNC Server and adjust its behaviour accordingly. If selected, the viewer will take control of the graphical compression scheme used, and will only request full colour updates if the network appears fast enough to support them. If not selected, then the user must select suitable encoding and format options manually.

PreferredEncoding=Raw/Hextile/ZRLE
ZRLE
Hextile
Raw

The ZRLE, Hextile and Raw radio buttons allow the preferred graphical encoding used by VNC Viewer to be controlled by the user. The available encodings are arranged in order of increasing bandwidth requirements and decreasing processing requirements, so that ZRLE is most effective on slow networks such as dial-ups, while Raw is often most effective on fast LANs. The preferred encoding is determined automatically by VNC Viewer if the Auto select checkbox is ticked.

Colour level

The Colour level box controls whether VNC Viewer should request as many colours as it and the server can handle, or one of a predefined set of lower-colour, less bandwidth-intensive levels.

FullColour=true/false
Full (all available colours)

If Full Colour mode is selected then VNC Viewer will attempt to render colours as accurately as possible. Otherwise, a reduced number of colours will be used, to limit the required network bandwidth. The reduced colour mode to use is determined by the LowColourLevel setting.

LowColourLevel=2
Medium (256 colours)

LowColourLevel=1
Low (64 colours)

LowColourLevel=0
Very Low (8 colours)

If Full Colour mode is not active then VNC Viewer will instead request one of a set of preset lower colour modes. These modes range from Medium colour, which requests 8bpp palettized pixel data from the server, to Very Low colour, which requests pixel data in 3bpp true-colour format, causing the entire desktop to be rendered in lurid primary colours.

Note that if the Auto select check-box is ticked then the automatic pixel format selection routines may override the user's selection and cause the connection to revert to Full Colour mode.

Inputs

SendPointerEvents=true/false
Send pointer events to server

By default, any pointer actions within the VNC Viewer window will be sent to the VNC server. If this checkbox is unticked then pointer events will no longer be sent, allowing VNC Viewer to operate in a view-only mode.

SendKeyEvents=true/false
Send keyboard events to server

By default, any key presses within the VNC Viewer window will be sent to the VNC server. If this checkbox is unticked then key events will no longer be sent, allowing VNC Viewer to operate in a view-only mode.

SendCutText=true/false
Send clipboard changes to server

By default, any text copied to the clipboard will be sent to the VNC server, so that the remote and local clipboards are synchronised. If this checkbox is unticked then clipboard data will no longer be sent, ensuring that clipboard actions made at the server are not affected by the viewer, and that sensitive data in the local clipboard cannot be leaked to the server.

AcceptCutText=true/false
Accept clipboard changes from server

By default, any text copied to the remote clipboard will be sent by the VNC Server to the VNC Viewer. If this checkbox is unticked then clipboard data sent by the server will be ignored, ensuring that clipboard actions made at the server cannot affect the local clipboard.

Emulate3=true/false
Enable 3-button mouse emulation

When 3-button mouse emulation is enabled, pressing the left and right mouse buttons simultaneously will instead be treated as a middle-button press event. This is used when accessing a system requiring use of all three buttons from a VNC Viewer machine that only has two physical buttons available.

PointerEventInterval=<milliseconds>
Rate-limit mouse move events

Over very slow networks such as dialup connections, mouse event data and mouse event acknowledgements can be a significant bandwidth drain. VNC Viewer can be configured to enforce a minimum interval between consecutive mouse movement events, to reduce traffic to and from the server. If PointerEventInterval is zero then mouse movement events are always sent to the server as soon as they occur. When ticked, this option sets PointerEventInterval to 200ms.

MenuKey=<key-name>
Menu key

By default, pressing the F8 key within a VNC Viewer window will cause the F8 menu to be displayed. The MenuKey option allows a different key to be chosen, or the menu key feature to be disabled. MenuKey may be set to any one of the function keys F1 to F12, or left empty to disable the menu key feature.

Misc

Shared=true/false
Share connection (do not disconnect other viewers)

When connecting to a VNC Server, VNC Viewer can request that all other connected viewers are disconnected before the connection continues. If Share connection is ticked then VNC Viewer will not request that other viewers be disconnected. Note that the server may choose to ignore or refuse VNC Viewer's request. Note that this option is only available when configuring the Default Options or when configuring a new connection, not when the connection is already active.

FullScreen=true/false
Full-screen mode

If the Full-screen mode checkbox is ticked then VNC Viewer will attempt to take over the entire local display in order to show the remote desktop. The full-screen setting can be set as a default, used for new connections, and changed once a connection is active. The F8 Menu also provides a shortcut to toggle full-screen mode.

UseLocalCursor=true/false
Render cursor locally

VNC Viewer 4 supports rendering of the VNC Server's cursor locally, by the viewer. This means that the cursor responds more quickly to mouse movemements and makes VNC connections over slow networks appear faster. Over faster networks, or for personal preference, this local rendering may be disabled by unticking the Render cursor locally checkbox.

UseDesktopResize=true/false
Allow dynamic desktop resizing

VNC Viewer 4 supports dynamic resizing of the VNC Server desktop. If dynamic resizing is not supported by both viewer and server then changes to the dimensions of the remote desktop may cause the VNC connection to be closed. Dynamic desktop resizing may be disabled if it causes problems on your system.

Protocol3.3=true/false
Only use protocol version 3.3

VNC Viewer 4 supports both the original VNC version 3.3 protocol, and the new VNC protocol versions 3.7 and 3.8. Some third-party VNC software use non-standard version numbers which may cause incompatibility issues. VNC Viewer 4 can therefore be configure to only ever use the original VNC protocol version 3.3, ensuring compatibility even with non-standard VNC Servers. Note that this option may be set as a Default Option, or when making a new connection, but cannot be changed once a connection is active.

AcceptBell=true/false
Beep when requested to by the server

By default, VNC Viewer 4 will play a default system beep when sent a bell event by VNC Server. The beep can be disabled by setting AcceptBell to false.

Using F8 Menu

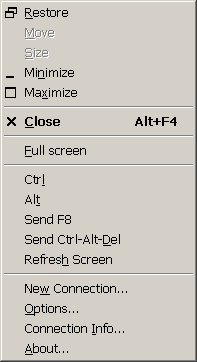
The so-called F8 Menu provides a quick way to access a set of frequently-used VNC Viewer functions. It is called the F8 Menu because be default it can be accessed by pressing the F8 key in a VNC Viewer window!

The F8 Menu can also be accessed by right-clicking on the titlebar of a VNC Viewer window, or by left-clicking on the System Menu button in the top left of the VNC Viewer window's titlebar.

Clicking anywhere outside the F8 Menu will cause it to go away again.

F8 Menu Functions

The F8 Menu provides the same set of available functions as the VNC Viewer window's normal System Menu, namely those allowing the window to be minimized, maximized, moved or closed.

Additionally, some VNC-specific actions are available:

Full screen

The Full screen menu item allows full-screen mode to be toggled on or off directly, without having to use the Options dialog. See the description of the Full screen setting in the Options page for more information.

Ctrl & Alt

Certain combinations of keys pressed with Ctrl and/or Alt are intercepted locally by Windows, preventing them from being passed to the server by VNC Viewer. The Ctrl and Alt menu options allow the Ctrl and Alt keys to be pressed or released at the server, regardless of the state of the VNC Viewer's local keyboard. If an item is ticked then the key is down (pressed), otherwise it is up (released).

Send F8

Because by default the F8 key is used to access the F8 menu, it will not be sent to the VNC Server when it is pressed. To send an F8 keypress to the server, you can bring up the F8 Menu locally and select the Send F8 menu option. If a menu key other than F8 has been selected then this menu item will behave accordingly.

Send Ctrl-Alt-Del

The Ctrl-Alt-Del key sequence is intercepted by the operating system for use as a Secure Access Sequence and so cannot be captured by the VNC Viewer for transmission to a remote server. Instead, you can bring up the F8 Menu and select Send Ctrl-Alt-Del to achieve the same effect.

Note that on some versions of the operating system, pressing Alt Gr-Del will cause the Ctrl-Alt-Del sequence to be captured by VNC Viewer without the operating system intercepting it. This is available primarily on European versions of the operating system.

Note that on all versions tested, pressing Shift-Ctrl-Alt-Del could be used to cause Ctrl-Alt-Del to be received by a WinVNC Server without having the local operating system capture the it.

Refresh Screen

The Refresh Screen option causes VNC Viewer to request a fresh copy of the current state of the entire server desktop. This is useful with VNC Servers that use imperfect update hooking schemes.

New Connection...

The New Connection... option causes a new Connection Details dialog to be displayed, so that a connection can easily be made to another VNC Server.

Note that a VNC Viewer started in this way actually shares the same process as the VNC Viewer window from which it was started. The VNC Viewer process will not quit until both windows have been closed. This may affect the behaviour of scripts which launch VNC Viewer.

Options...

This causes the Connection Options dialog to be displayed, allowing the settings for the current connection to be modified. See the description of VNC Viewer Options for more details.

Connection Info...

The Connection Info dialog displays information about the remote host, pixel format, line-speed estimate and protocol version. If you don't know what any of this means then don't worry - it's all safe to ignore! The main use of the Connection Info dialog is to help in diagnosing any problems you might encounter while using VNC Viewer.

Problems?
If you have difficulties which are not covered by this document, try reading the FAQ. There are also some pages to help with troubleshooting.

If that doesn't help then try searching the archives. There are tens of thousands of items collected over several years.

If that doesn't help then try subscribing to the mailing list and ask your question there.